Saturday, December 23, 2023
Painting River Pieces
As promised, here is the blog post on how to paint the resin cast river pieces I described in my previous post.
First, all of the resin pieces were coated with a primer coating of flat black spray paint.
Next I used a bottle of Navy Blue cheap craft paint. The fact that this is cheap paint that does not cover the primer in one coat is actually an advantage! The look I want is a covering of navy blue with black undercoat showing through. You can see what I mean below.
The next step is to apply dark green (green velvet) in the shallow areas of the water. I use an old bristle brush and heavily stipple the green paint onto the rivers. After that using a lighter green (moss green) I add a lighter stippling of light green paint into the same areas. These green layers will add a sense of depth to the water. It is dark blue to black mid-stream but fades to lighter green on the edges where underwaer rocks are visible.
The next color to apply is burnt umber. Apply a solid covering of this dark brown paint to the river banks, the gravel, and the rocks. This was my most time consuming step.
Now we start dry brushing with a medium gray (Storm Gray). Dry brush the gravel and the rocks, doing your best to avoid getting gray paint on the river or the banks.
Next I dry brushed the banks with a medium brown (nutmeg). And then I dry brished the rocks and gravel with a light gray color. (dolphin gray)
The next step is to apply some ink. As the dry brushing is done, it is inevitable that some of the gray and brown will get onto the river surface. Typically it will be on the surface right next to the water's edge. To fix this I use a mix of 1 part sepia ink with 3 or 4 parts green ink. Dilute the ink with 4 or 5 drops of water and then using a small wet brush, apply the ink wash to the edge of the water. I also apply the ink wash to the gravel and the rocks to give them more variation of color. Here are three photos of the same area. The first is the piece before this step and it shows how the dry brush has lightened some of the water areas. The next photo is taken while the ink wash is still wet so you can see exactly where it was applied. The third picture is after it is dried.
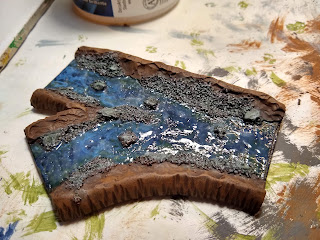
Using a product called Mod Podge, a glossy sealer, I add a layer of gloss all over the river areas. Using a shader brush I push the mod podge into the edges of the water. Be careful not to work this too much with the brush, when it gets frothy it will leave some bubbly texture. A little bit of this effect is okay, but you don't want to obscure all of the nice depth of color that has been applied. This product goes on white-ish and dries clear and glossy. Here is a photo of it when wet, and afer drying.
Now I add one more coat of gloss with a product called "Triple Thick". It is basically really thick acrylic gloss medium. I generously dab this stuff onto the river areas to give the finished pieces a rippled surface of water. When dry it makes the water reflect in lots of different directions. Again it goes on white-ish and dries clear.
The final step is to use watered down white glue to glue green flock onto the tops of the river banks. Here are a couple of photos of my finished set of 34 pieces, and a few pictures of them on the terrain mat.
Subscribe to:
Post Comments (Atom)


Those came out looking fantastic, Glenn!
ReplyDelete